Virtual Reality

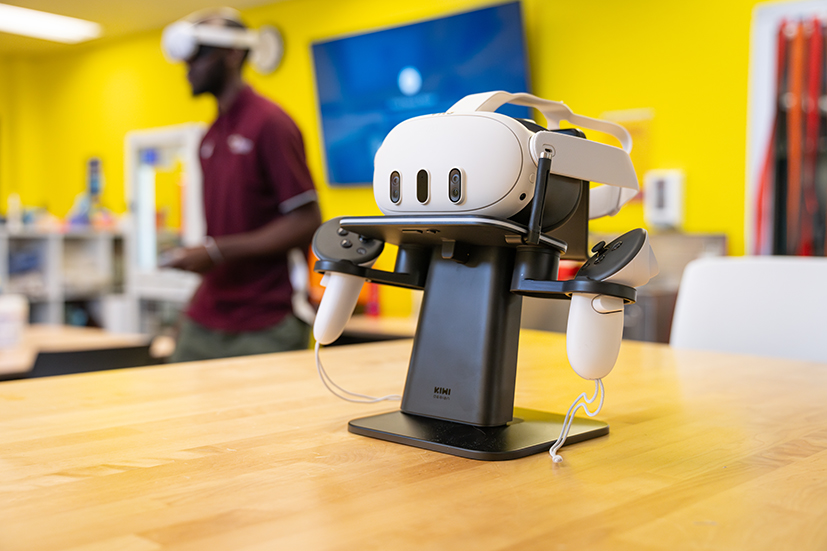
A white Meta Quest 3 perched on a black charging station on a beige wooden table. Two white Meta Quest 3 controllers are on each side of the stand.

VR allows you to be immersed in a 360° virtual environment where you can interact with objects, the world, and other users. Our headsets are self-contained, meaning you aren't tethered to a computer and can move freely!

How Does it Work?

The MacEwan Makerspace offers patrons one-hour time slots to use our VR headsets. A staff member will guide you through the start-up process including setting a boundary to help you stay within a safe area and be there if you have any questions while using the headsets.

Booking - Please carefully read and complete the waiver as part of booking your headset and time slot!

There is a maximum of 5 patrons using headsets in the Mediaspace (6-203) during each session. If more than 2 patrons wish to use VR at once, they must do so sitting down, due to space limitations.

Caution: Some patrons may experience motion sickness while using VR headsets. It is recommended to take a break after 10-15 minutes in the headset. If you begin experiencing any negative effects while in VR, please inform a staff member, remove the headset/ask for assistance and sit down if you are not already. 

Note: If you wear contact lenses or glasses, these should be worn while using VR, otherwise the content may be blurry, however some glasses may be uncomfortable when worn in the headset.

Headset Specifications

Model: Meta Quest 3 
Storage: 128GB 
CPU: Snapdragon XR2 Platform 
Ram: 8GB 
Display: 2 LCD Lenses (2064 x 2208 PPE), 4K + Infinite Display (25 PPD & 1218 PPI) 
Straps: 2 adjustable straps; Located on the back & top of the head. 

Apps

All VR headsets are using generic accounts.

The applications and games currently available on our headsets are:

  • Beat Saber
  • Super Hot
  • National Geographic Explore VR
  • Brink Traveller
  • Gravity Sketch
  • Asgard's Wrath 2
  • YouTube
What does Using VR Look Like?

Headset and Controller Diagrams

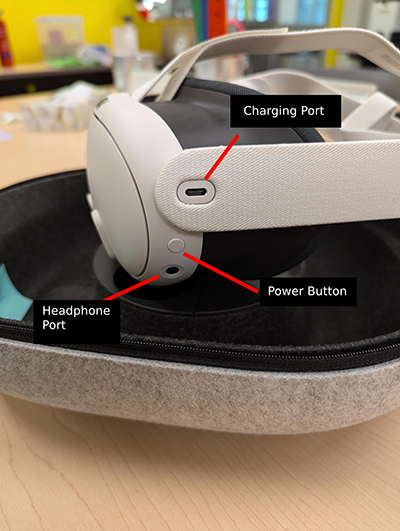
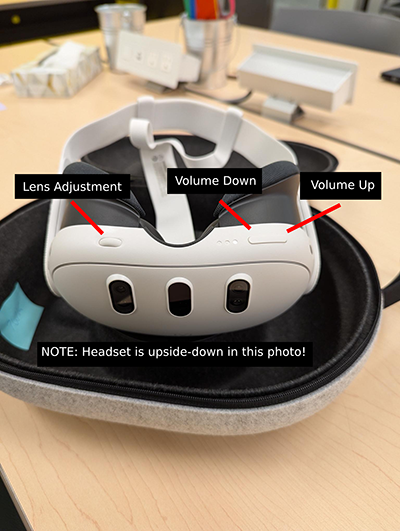
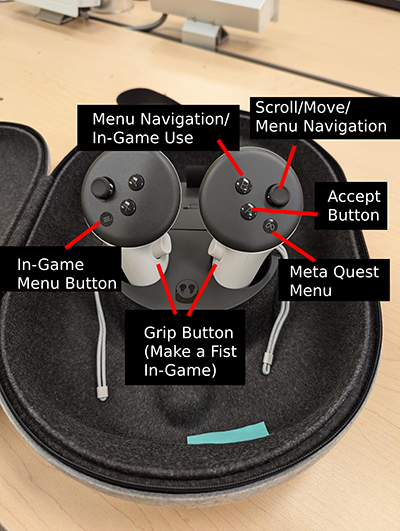
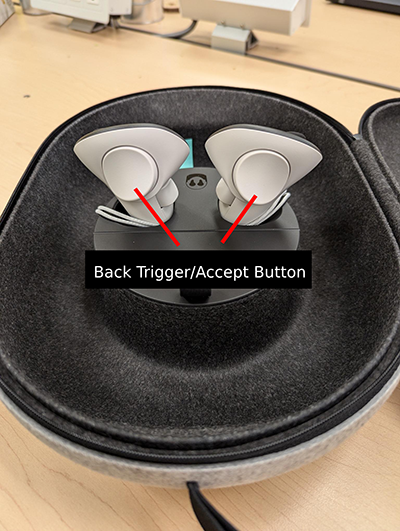
Left side of a white Meta Quest 3, each component is labeled. The charging port is an oval shape, located in the middle of the left-side strap. The power button is round, located on the left side of the headset. The headphone port is round, located on the left side of the headset, directly under the power button.  A front view of a white Meta Quest 3, turned upside down. The components are labeled. The lens adjustment dial is on the bottom of the headset on the left side. The volume up and down button is an oval, on the bottom of the headset on the right side.View of white Meta Quest 3 controllers from the front. The components are labaled. On the right controller, the smooth button under the analog stick is the Meta Quest menu button. It's used to re-center your view, quit games and access settings/the game library. The 'A' button is located on the right controller to the left and under of the analog stick. It's used to accept/press ok in navigation and has in-game use. The 'B' button is located on the right controller directly to the left of the analog stick. It's used to go back in navigation and has in-game use. The analog stick is on both controllers in the middle at the top of the controller, it's used for scrolling/moving/general navigation. The grip button is on the inner side of both controllers, it is used to make a fist in-game.  View of white Meta Quest 3 controllers from the back. The components are labeled. The back trigger button is generally used to accept/confirm inside VR.

Accessing the Apps & Games

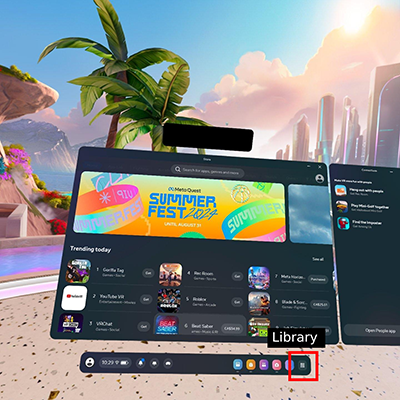
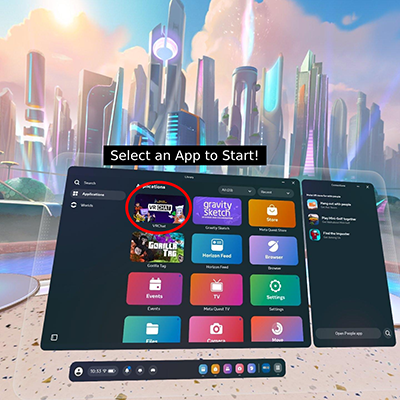
Screenshot of the main menu in the Meta Quest 3. The "Library" button is surrounded by a red square with the word "Library" written above it.  Screenshot of the Library menu in the Meta Quest 3. The menu has several rectangular icons for different apps. VR Chat is highlighted with a red circle in the top left corner with the words "Select an App to Start" above it.

Setting Up Boundaries

Getting to the Settings

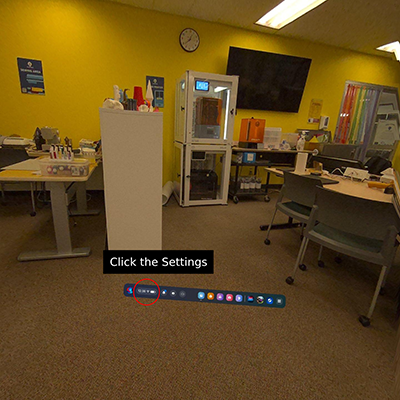
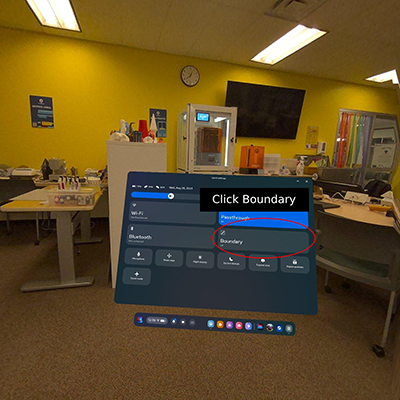
Screenshot of the Meta Quest 3 menu bar with the settings button highlighted in the bottom left corner. It's highlighted with a red circle with the words "Click the Settings" above it.  Screenshot of the Meta Quest 3 settings menu with the boundary button highlighted in a red oval. The button is in the middle-right section of the screen with the words "Click Boundary" above it.

Stationary Boundaries (Sitting)

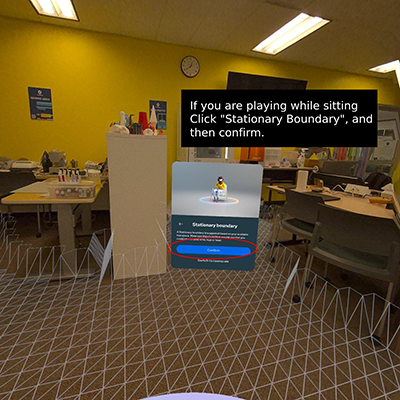
Screenshot of the Boundary menu set to Stationary Boundary. This boundary is used if you are sitting while playing. The "Confirm" button is highlighted with a red circle.

Roomscale Boundary (Standing)

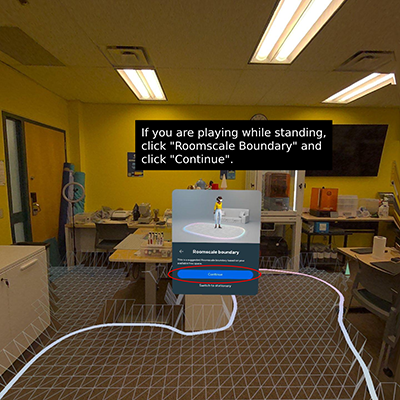
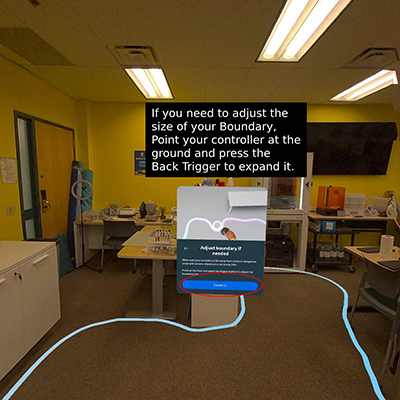
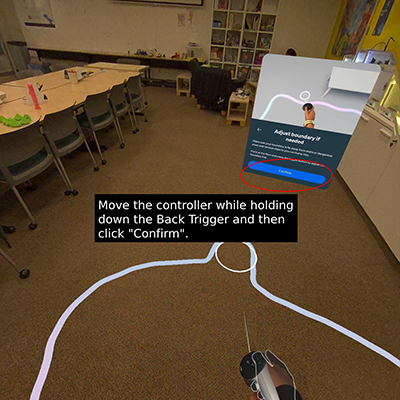
 Screenshot of the Boundary Menu set to Roomscale Boundary. This boundary should be used if you are standing while playing, the confirm button is highlighted with a red oval.  Screenshot of the Boundary Menu in Roomscale Mode, there are instructions on how to expand or reduce the size of your boundary.  Screenshot of the Boundary Menu in Roomscale Mode, showing the expansion of the Boundary.